


|
|
Tables
How to insert
text, insert picture, Set Vertical Alignment
In this lesson we will show you how to Insert Text, Pictures,
Set Vertical Alignment. (On the next page of this lesson your
will learn Resizing a Table by Dragging, Drawing a Table and how to Erase a
Cell, merge split cells and more.)
How to Insert Text: For this example we have inserted a table,
50 % Width, Centered, 4 Rows with 2 Columns, border size 2 Pixels.
| Row 1 (step 1) |
 (step
2) (step
2) |
| Row 2 |
|
| Row 3 |
|
Row 4
Column 1 |
Column 2 |
-
Insert Text: Click in the cell at the place you want
to add text. If you want to add more text like you see in Row 4 Column 1, press
the Shift & Enter to start a new line. If you want to start a new
paragraph, just press Enter. To jump to the right cell press the tab key. To
jump one cell to the left press Shift & Tab keys.
-
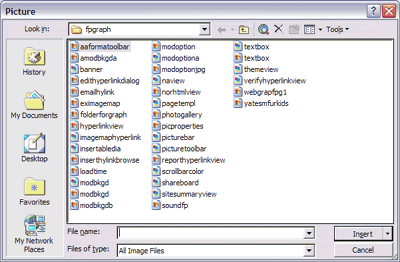
Insert a Picture: Position your cursor at your desired insertion
point within the cell you want to place your image. Click the insert button from
your file menu, click picture, click from file, find picture and click it then
click the insert button. For this demo we are going to insert the mouse into the
top right cell.
NOTE: you can find the picture and double click it and it will auto insert
-
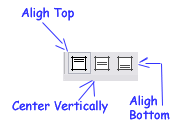
Setting Vertical Alignment: The table building tools are found
on the tables toolbar.

You can change the vertical alignment of elements within a cell. Select the
element you want to modify, and then click the Align Top, Center Vertically, or
Align Bottom in the tables toolbar.
Or you can simply right click inside the table or cell, choose
properties and do the same functions there.
Click here to continue to
( Resize table by dragging, Draw a Table,
Erase a Cell, using the Insert Table Button, Merge Spilt Cells, Remove Rows or
Columns, Adding table Captions. )
|