| |
 |
|


|
|
|
  |
|
Making your Own Buttons,
Dividers, and Web Design Elements Continued |
Buttons Cont:
Steps to making a simple web button and other web elements
First you need to determine the size you wish your navigation button to be.
The buttons for this page *width 120, height 30*.
-
Open PSP
-
Click File
-
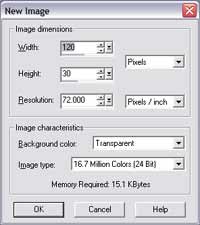
Click New * Make sure your settings match
those in graphic 1, then click ok. * Setting are: *Width
120, Height 30, Resolution 72,000, Background Transparent, Image type, 24 bit*
|
|
Graphic 1
-
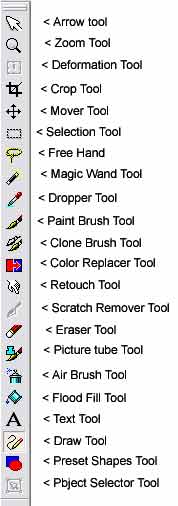
Now click on the Flood fill tool *click
here to see the tools*
-
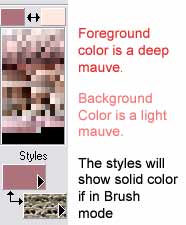
Click on the Foreground Color icon *See
graphic 2 below*.
Graphic 2
Graphic
-
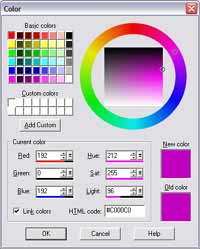
Choose your color from the colors palette pop
up *see graphic 3* By clicking the color of your choice. Click ok.
-
Click the (>) arrow on the Style icon * see
graphic 2 *
-
Click the brush Icon * this will give you a
solid color through-out your button.
-
Now Click inside the transparent Button area.
This fills the transparent area with the color you picked. You should now have a
flat colored rectangle.
-
Now click effects from your
menu bar
-
Click 3D
-
Click Buttonize
-
Set desired settings for our button we used
height 20, width 20,Opacity 75%
-
Click on file
-
Click save for web
-
Name your button Congratulations you've just created a web button.This is the finished simple purple button we
made with this tut >>
Congratulations you've just created a web button.This is the finished simple purple button we
made with this tut >>

Using the same steps above *to make the
buttons* you can easily make other design elements. Like Banners a good
size to play with is 600 x 60 and web elements like Backgrounds and logo's
( make sure to change your settings for width and height for each individual
element like the horizontal line used on this page.
 |
< Bullets keep these small. And keep your eye
on the file size of all your graphics the smaller the better and the faster they
will load for you and your viewers. |
Remember to play with the different
settings. Example: adding a simple gradient effect to the button the results are vastly different. I added two colors using the styles Option
choosing the gradient icon to get this button effect. I changed the setting to
10, 10, 75. Which gives a smoother softer look. Put your imagination to
work and come up with your own unique designs. Enjoy ...
the results are vastly different. I added two colors using the styles Option
choosing the gradient icon to get this button effect. I changed the setting to
10, 10, 75. Which gives a smoother softer look. Put your imagination to
work and come up with your own unique designs. Enjoy ...
End of Tut...

Back to Top |
|
Home | Up | Web Basics | FrontPage Tuts | PSP 7 Tuts | Links | FeedBack |
|
| |
|