

|
|
Working with Tables
A table (s) helps to control your page (s) layout. Using tables
helps to keep your pages looking smart and professional. NOTE: (
nesting tables and table background colors are not supported in
all browsers keep this in mind as you design your website.)
We are going to create a simple table and then add both text and graphics to the
table cells. (For *more in-depth
instructions on customizing* to fit your specific needs continue to next page of this
lesson.)
-
Open the page you wish to insert the table. Place mouse cursor
at desired table insertion point. ( choose the word table from the
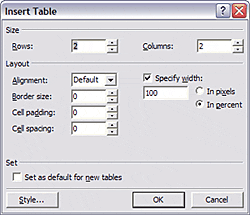
file menu, choose Insert Table. The Insert Table dialog box opens.

-
In the Rows and Columns text boxes, type the number or rows and
columns you want the table to contain. Not sure? Then put in more
then you believe you'll need you can always delete the extras later. Don't worry
be happy its easy to add more later too!
-
Align the Table; Before placing your table on the page, you need
to plan your layout choices. Click the down arrow next to the alignment text box
and make a selection to position the table at your desired location on your web
page.
-
Set your Border Options; No border showing = set the border size
to 0. This means the border is invisible to the browser. (note: you will see a
dotted line that represents the border in page view.) Generally speaking
invisible borders or limited borders of 2 pixels are preferable for the
professional looking site.
-
Setting Cell Padding and Cell Spacing: type a number in the Cell
padding text box to set a buffer of white space around the text or image in a
cell. This value in the Cell Spacing box determines the number of Pixels
between each cell.
-
Set table width: The specify Width option is selected by
default. You can select either the In Pixels or In Percent options to
specify your table width. Selecting in percent sets the table's size in
proportion to the visitor's open browser window. ( A table set to 100% can
be used to organize the entire page). (if you plan to make more tables
with the same properties you have set, select Set as Default for new tables.)
When you finish making changes, clink the OK to save all settings.
NOTE: IF you set you table width using %, example: 100% for your table
width. Your visitor decides how wide your tables are. If the browser
is open wide, the table expands. When the visitor decides to reduce the
size of a window, the table contracts, and its contents can become jumbled.
To avoid this, set the table size to a specific number of pixels. NOTE:
(Test your page in different resolutions to see how it looks.)
Click here to continue to.
( how to insert text, insert picture,
set vertical alighnment )
|
