


|
|
Using Image Maps
See PSP Tut 6 for how to make the
Image for a very simple Image map graphic.
You can use clip art or an image you have already, if you don't wish to make
your own. Image maps are very easy to create and can provide you with
multiple design
options. (NOTE: You'd still need a
text link on your web site for those that choose to surf the web with graphics
turned off!)
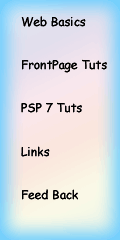
Once you have the image you want.. it's time to create-map the
areas, on your image to the pages you wish to link too. The Graphic below
is a working Image map.
-
Insert your graphic into you page
-
HOW?: Place cursor at desired location for graphic, go to the
insert menu, click Picture, find your graphic click it to insert it in to your page.
-
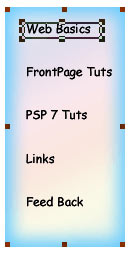
Now click on the Graphic.
-
Now find your pictures tool bar it looks like this

-
For the map above I choose the rectangle * see the blue
underlined area of above graphic*.
-
Then I dragged a box around the word Web Basics
-
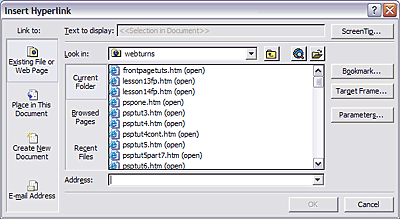
The following Dialog box pops up
-
Find the page you wish to link too and click it. Click OK the
Hyperlink will be created for you by FrontPage.
-
Follow the steps above for as many links as you need to assign
to your graphic.
-
Now test your new map, click File
-
Then Preview in browser to see if your links work by clicking on
your map. Each link should now take you to your desired page. If all
is working correctly.
-
Click, file, publish and publish your website.
You have completed this lesson.
|